Layer Drawer
The Layer Drawer is the central hub for managing all visualization layers in CartoScope. Located on the left sidebar, it allows you to load new background, factor, or gene layers, toggle visibility, adjust opacity/colors, and drag-and-drop layers to change their rendering order.
Interface
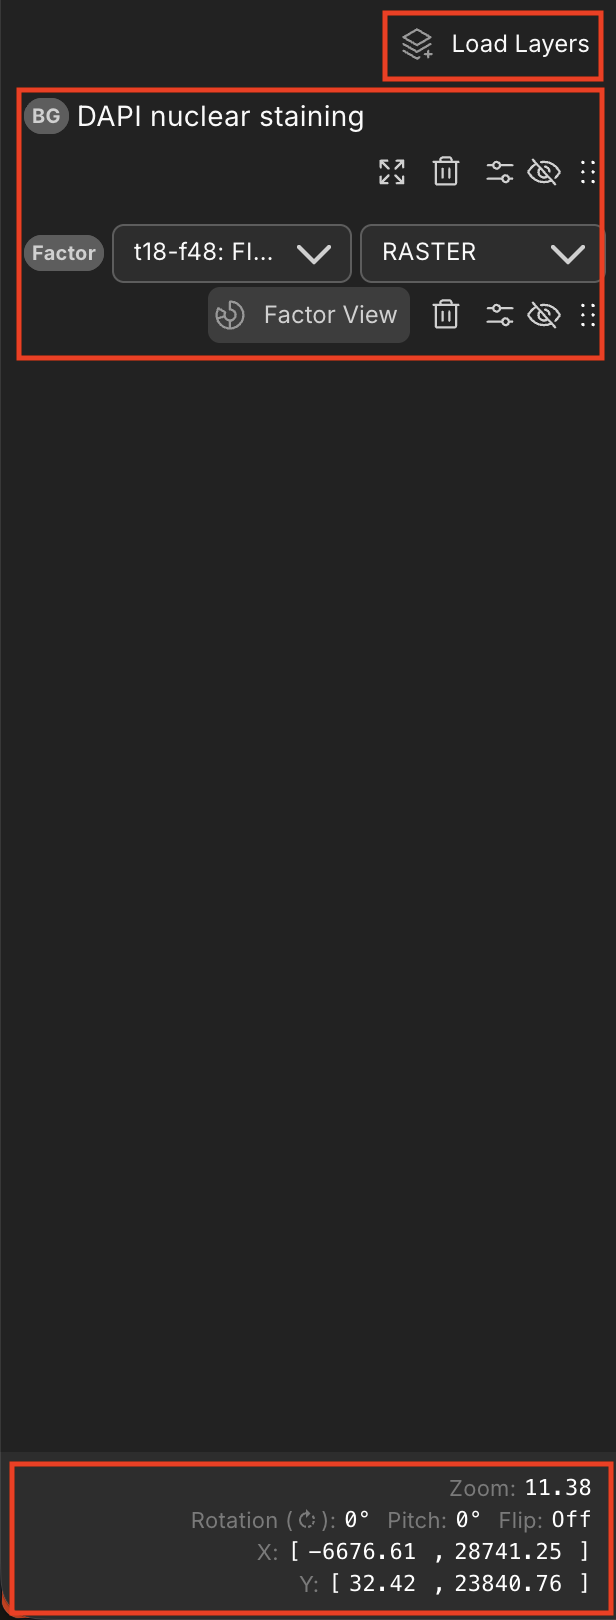
1. Control Panel
The top Control Panel provides global buttons and shortcut actions for managing layer configurations:
- Add Layers:
- Load Layers Button: Click and choose a layer type (Background, Factors, Genes). Opens the Add Layer dialog to add new layers.
- ROI Button: Click to add an ROI by creating a polygon or uploading a GeoJSON file.
- Layer Filter/Search:
- Search Field: Type to search for layers by name.
- Filter Buttons: Filter layers by type (ROI, Gene, Factor, Background) or visibility (Active, Hidden).
- Layer Bulk Management:
- Select/Deselect All: Select or deselect all layers in the layer list.
- Hide/Show: Once one or more layers are selected, use the hide/show button to toggle visibility of selected layers.
- Color: Once one or more layers are selected, use the color button to change the color of selected layers.
- Opacity/Radius: Once one or more layers are selected, use the opacity/radius button to adjust opacity of selected layers. Radius only works for specific layer types.
- Delete: Once one or more layers are selected, use the delete button to remove selected layers.
2. Layer List
The list displays all currently loaded layers, including active layers and hidden layers.
Components within the Layer List
The example below shows four layers from top to bottom: a Region of Interest (ROI) layer, a Gene layer, a Factor layer, and a Background histology layer.
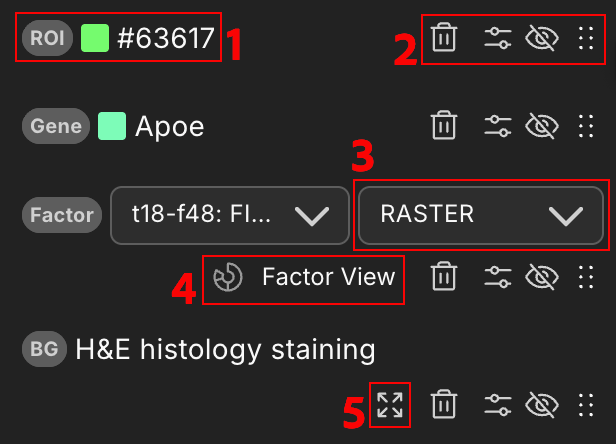
1) Layer Information Fields:
* Layer Type: Category badge ("ROI", "Gene", "Factor", or "BG").
* Color: Representative color swatch (applies to Gene and ROI layers).
* Layer Name: Display name of the layer (e.g. #63617 for an ROI, Apoe for a gene, t18-f48... for a FICTURE factor result, and H&E histology staining for a background image).
2) Control Fields: * Delete Button: Remove the layer from the active session stack. * Settings Button: Opens layer-specific configuration controls: * Color Picker: Set custom color palette or assign random swatches. * Opacity Slider: Adjust transparency level (0% to 100%). * Visibility (Eye Icon): Show or hide the layer without deleting it. * Stack Order (Move Up / Down): Adjust rendering hierarchy in the map stack.
3) Factor Layer Special Controls: * Factor Layer Mode: Select display mode (e.g. Max Factor, Weight Intensity, Single Factor Probability). * Factor View Button: Open the Factor Drawer to inspect factor drivers and marker gene weights.
4) Background Layer Special Controls: * Scale Button: Auto-scales and fits the background image to the active map viewport.
3. Map View Summary (if single-sample session)
In single-sample sessions, the bottom of the Layer Drawer features the Map View Summary panel. It provides real-time viewport readouts (Zoom, Subsampling Rate, Rotation, Pitch, Flip status, and X/Y Bounds) and allows direct numeric editing.
For detailed documentation on displayed parameters and numeric editing, see the dedicated Map View Summary manual page.
Related Pages
Concepts
- What are Layer Types?
- What is Typical Background Layer Naming Scheme?
- What is Typical Factor Layer Naming Scheme?
- What is Subsampling Rate?
Manual Pages
How-to Guides